Wednesday, August 14, 2013

Vintage Flower Tag

Hello Friends!!  It’s been such a hectic week!!  This past week was my first full week back to school and I don’t know who’s more exhausted!!  Me or the kid’s in my classroom!!  But, schedules are coming together and the kids are adjusting back to the routine, so life is good!  I am also proud to say that my husband and I celebrated 28 years of marriage on Saturday!  He is the best man I know and I am so blessed to have spent all these years together!!  He is more than I could have ever dreamed of in a husband! Now I just have to get through my son’s wedding in November and I will be good to go (ha!)!!  The wedding will keep me busy, but I just can't believe my first baby is getting married!!  Where did the time go?!?!

Today was my day to share over at http://shesasassylady.blogspot.com/ and I created a vintage flower tag!! You know I just had to break out the Glimmer Mist sprays!!  So here is my tutorial, I hope you enjoy it!!

Vintage Flower Tag

This is my take on a vintage flower tag!  It was so much fun and easy to do and I used some of my favorite “stuff”!!  So, on that note, let’s make a tag!!


I started out with a standard shipping tag (4-3/4 x 2-3/8).  I actually bought some at the office supply store, I got 100 tags for just a couple bucks.  On days that I have more time I will cut a bunch out on my cricut as well!  There are so many carts with really cute tags!  I sprayed the tag with two different glimmer mists. (My favorite "stuff" to play with!)  Olive green on the top of the tag and gold on the bottom.  (hint:  I keep a large pizza box on hand when spraying my glimmer mists!  It saves me on having to clean any mess I make)  I then gave the tag a quick dry with my heat tool.


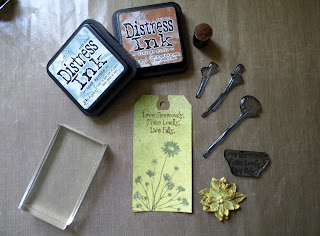
I knew I wanted a sentiment on the tag so I pulled out my big book of stamps! (I will have to pull that out for all of you sometime!)  I found a nice sentiment and flowers in the Treasured Memories stamp set by CTMH.  I used Vintage  Photo Distress Ink by Tim Holtz to stamp my sentiment and Iced Spruce Distress Ink for the flowers.  I also used my little dauber thingy (lol) to distress a flower I found in my stash.

It took just a few moments for my ink to dry on the tag and on the flower.  Then I used my handy dandy quick dry adhesive and glued the flower down onto the tag.  I also grabbed my Prima branch bark chalk and chalked the edges of the tag.  When I am doing a “vintage look” project, I make sure to let the chalk actually bleed over onto the surface to help me achieve that worn look.  I grabbed a 6 in. piece of twine and tied it on the top and there you have it!!


You can do so many things with tags!  They are great for journaling, but I think a tag like this would look so pretty on a bouquet of dried flowers or used as an embellishment on a vintage layout!!  I hope that my little creation encourages you to create some of your own tags!!  Have a great day everybody!!  Go forth and create!!!

Tuesday, July 30, 2013

Hand Made, Hand Painted Card


Come Craft With Me!!
Hello my creative friends!!  I am sorry I haven’t posted in a few weeks, life for me has been rather crazy!  I went to spend some much needed time with my sister and nieces out at my Mom’s house in Ohio.  Then my Mom and I flew out to Florida for a week!  I am so excited for her as she purchased her winter home paradise while we were down there (and an awesome red golf cart lol)!!  So, now I think I know where my spring break destination is going to be hehe!!


I am THRILLED to announce that TODAY my very first tutorial post was published over at http://shesasassylady.blogspot.com/ !!  Her blog is wonderful, so please stop by and visit!  Here is the tutorial I shared over at Sassy Lady!  I hope you enjoy it as much as I enjoyed creating it!!

Hand Made, Hand Painted Card Tutorial

Hi!!  I’m Leslie from http://scrapnlifeaway.blogspot.com/ !  I am brand new to blogging, but I have been a die-hard scrapbooker  for about 6 years now!  This is my very first post here at She’s A Sassy Lady!  Thank you to Sheila for giving me the opportunity to be part of your Design Team family!!  I hope that I can encourage others to be creative!  I am not gonna lie, I’m rather nervous, but onward and upward!!  Let’s make a card!!


I started out with a basic 8 ½  x 11 piece of ivory card stock and cut it in half to create my 5 ½  x 4 ¼  card base.  I then cut one 5 ½  x 4 ¼  patterned paper from my DCWV Stack 7 pad.  Chalk the edges of the patterned paper with my Prima Branch Bark chalk.  Then adhere it to the front of the ivory base.  Cut two 5 x 3 ¾  mats using dark tan paper from my DCWV Mariposa Stack.  I trimmed the bottom of each mat using one of my EK punches.


Using my VersaMark watermark stamp pad, I randomly stamped three different flowers (from Scrappy Cat) on the mat that will go on the front of the card.  I stamped my “thank you” sentiment from the CTMH Casual Expressions stamp set in the lower corner of the mat.  I then covered my stamped images with Rangers Copper embossing powder and then hit them with my heat gun.  I also stamped and embossed a flower on the mat that will go inside my card.


I wanted to add color to my flowers, but I don’t own any Copic Markers, and I didn’t like the look when I tried my water color pencils.  BUT, I do own some Perfect Pearls by Ranger!!  I used Blush, Forever Violet, Blue Smoke and Forever Green.  Using a paint brush with a very thin tip, I painted each flower.  I allowed about ½ an hour for my painted mats to dry.


After my flowers were dry, I chalked the edges of the mats with my branch bark chalk.  On the mat that goes inside the card, I stuck a ½ in. strip of the patterned paper on to the top of the mat.  I thought it would add some nice contrast and tie it into the front of the card.  After looking at the mats, I decided they still needed a little “something”, so I glued some small gems onto the centers of the purple flowers.


And here it is!!  A hand made, hand painted card!!  You can make this card so versatile by simply switching out the sentiment!!  I hope that you enjoyed my very first tutorial!  Please feel free to stop by my blog!  I am starting on a wonderfully creative journey and I would love for you to follow along!  Who knows where we will end up!  A huge thank you to Sheila for having me visit today!  I’ve had a creative blast!

Always,

Leslie

Friday, July 12, 2013

Christmas Traditions - Christmas in July, Part 2

Our family has always had traditions, such as watching It's A Wonderful Life during the Christmas season.  When new people become part of your family, they bring with them the traditions they shared with their families.  As is the case when Katrina became part of our family!  One of those traditions being, that the kids get to open one gift on Christmas Eve (always their Christmas pjs!!)  So, this past Christmas Miss Khloe got to open her Christmas Eve gift!!  She was so tired, but just looked so darn cute!!


I am quite sure I could have added some bling, but it looked just right to me as is.  And that's ok!!  Some days I like to really load up on the embellishments, Prima being my favorite!  But this layout is about a simple time in Miss Khloe's life!!  Lord knows it will be much less simple as she gets older (as Jim and I laugh to ourselves, the kids are gonna have their hands full with this little one when those teenage years approach!!)

It is my hope that this layout inspires you to create and preserve your memories of your family traditions.  So that one day, your family can look back and say "remember when"!!

I would love to hear from you!! Please make sure to leave me a comment and I would love for you to follow my blog!! Thanks for stopping by and have a great day!!

Always,

Leslie

Monday, July 8, 2013

Made In America (a few days late) !!

Hello Friends!!  Sorry that I haven't posted in about a week.  I went out to Ohio to visit my sister, two neices and mom out in Ohio and just got back yesterday!  (the internet connection out there was not very good)  It was a much needed break and I have to say that we laughed the whole time we were all together.  Nothing better than girl time with your sister, I will post some pics of our weekend later in the week!

Because I was in Ohio, I missed the 4th of July celebrations with my family back here in Indiana.  So, I didn't get any pics of my Khloe girl on the holiday, but I do have my layout from her very first 4th of July,  which brings me to the lesson of this post.  I love to create layouts with textures and bling and just making them pop.  But, it's also ok to not always have all the "extras".  It has taken me a long time to realize it's not always what you put on your layouts, but the story you tell with them.  So, here is the layout that I did of Miss Khloe's very first 4th of July!


I'm really loving learning how to play with mixed media stuff and adding texture to my layouts, but it's nice to go back to the basics, to remember to tell the story!  The handsome young man is my son, who is Khloe's very proud daddy!  It was such a fun day for them, remembering their baby girl's very first 4th of July!

I hope that your holiday was filled with what makes you happy!!

I really love hearing from you!! Please make sure to leave me a comment and follow my journey on my blog!  Thanks for stopping by and have a great day!!

Always,

Leslie

Monday, July 1, 2013

Christmas In July

I just love love love this layout!!  A family tradition of ours is to watch It's A Wonderful Life during the Christmas Season!  Well, without realizing it, when I took a picture of our tree, I also caught a picture of George Bailey!!  Which will now permanently remind me, whenever I look at this layout, that it truly is a wonderful life!


I would love to hear from you!! Just leave a comment below and don't forget to follow me!!  I have so much more to share!!  You won't want to miss a thing!!  Thanks for stopping by and have a great day!!

Always,

Leslie

Tuesday, June 25, 2013

They Called It A Blizzard!!

This past Christmas was so much fun with Khloe!  This was the first Christmas that she "kinda" knew what was going on. Well, she knew something fun was going on!  Anyway, we live in Indiana and are transplants from Cleveland!  In Cleveland we know what snow is and we know what a blizzard is (oh how I remember the blizzard of 78!!).  So, the day after Christmas, we had a "blizzard" here in Indianapolis.  This was Khloe's first real taste of snow.  The year before we had a whopping 8"!  Not much snow for a little girl to play in!  So I have scrapped Khloe's first time playing in the snow!  Hope you enjoy this double two page layout!!


The paper I used is from Bo Bunny, and the snowflake is from a cricut cartridge I borrowed from a friend and I can't remember the name of it!  I promise to write more information down about my layouts!  But I do have to say, I really really loved this Bo Bunny paper!!  I hope that these snow layouts inspire you to create pages about snow and how much fun it is!  It is amazing to me to watch the wonder in her eyes!  It's like seeing things for the first time all over again!!

This little angel keeps me young at heart, even when my body feels older than dirt lol !!!  Hope you enjoy them!!

I would love to hear from you!! Just leave a comment on my blog below!! Thanks for stopping by and have a great day!!

Always,

Leslie

Monday, June 24, 2013

Prima Sneak Peak on Tuesday!!

On Live with Prima tomorrow:
Sneak Peek of Anna Dabroska's (Finnabair) new Prima collection!

See the class here: http://www.ustream.tv/channel/primaflower

Vintage Vanity Collection with Anna Dabrowska
Tuesday, June 25th at 11:00am PT/ 2:00pm ET/ 6:00pm GMT/ 7:00pm UK, Ire

Join Anna Dabrowska to see her fabulous new Vintage Vanity collection for Prima! This collection boasts a soft and beautiful color palette on a neutral background that will be perfect for mixed media projects, layouts and more! Plus, you will get to see some of the gorgeous new embellishments that come with this line too!